Lifecycle of React Functional Components
React Hooks were introduced in version 16.8.0. The lifecycle of React functional components is entirely different from the class-based components.

In this article, I'll not only talk about the lifecycle of functional components but also about the prerequisites and many concepts required to fully understand the flow. Many beginners skip the in-depth understanding of the lifecycle of react components because of a lack of some fundamentals.
We'll only focus on functional components and not class-based components.
Prerequisites
There are a few things we need to understand to fully grasp the lifecycle of a react component, such as CRP, Render, Mount, etc.
Basics of Critical Rendering Path

The Critical Rendering Path is the sequence of steps the browser goes through to convert the HTML, CSS, and JavaScript into pixels on the screen (Definition in MDN).
What we see on the screen when we visit a web page or app in the browser is not magic. When we request a certain webpage or app by clicking on some link or directly entering the URL, the browser starts downloading the HTML and then begins parsing it, converting the received bytes to the DOM tree. The browser continues to parse the HTML making requests and building the DOM, until it gets to the end, at which point it constructs the CSS object model or CSSOM. DOM has the contents of the app and CSSOM contains the styles related to the specific DOM nodes.
DOM and CSSOM are then combined to form the render tree. It has all the DOM nodes combined with their specific styles. The render tree contains all the visible content of the app.
Once the render tree is built, the layout becomes possible. The layout step determines where and how the elements are positioned on the page, determining the width and height of each element, and where they are in relation to each other.
This step is kind of having information about everything that's going to be finally painted on the screen but it's not yet physically there as pixels.
The last step is painting the pixels on the screen. Once the render tree is created and the layout occurs, the pixels can be painted on the screen. On load, the entire screen is painted and a user sees the content on the screen.
We understood the basics of the critical rendering path. React as a UI Library, manipulates many things in the path abstracted away from us. To understand the lifecycle of react components, we must have a good understanding of this process.
What is Render?
import React, { useState } from 'react';

export default function MyComponent() {
  const [title, setTitle] = useState('Default Title');

  return (
    <div>
      <h1>{title}</h1>
      <button onClick={() => setTitle('New Title')}>Change Title</button>
    </div>
  );
}
Let's understand the difference between render and mount first. See the above code.
A component function is just a normal function in Javascript which react calls for us. In the above code, if we want to use the component MyComponent, then we just have to put it like this <MyComponent/>. This is very important to know that while we're putting the component function like this, we're not calling the function, we're just instructing react to call the function later on our behalf.
Component functions have one special thing, they only return a react element.
React element is a plain and simple javascript object which describes the UI which should be visible on the screen, but it's not painted yet (This difference is very important to understand).
In the above code, the function MyComponent is returning JSX which is a React element under the hood.
This code 👇
return (
    <div>
      <h1>{title}</h1>
      <button onClick={() => setTitle('New Title')}>Change Title</button>
    </div>
  );
is under the hood like this 👇
return React.createElement("div", null,
            React.createElement("h1", null, title),
                 React.createElement("button", { onClick: () => setTitle(
                                        'New Title') }, "Change Title"));
JSX is just the syntactic sugar over this. And these React.createElement calls simply create plain JS objects.
For Example -
// JSX is a syntax sugar for these objects.
// <div className="blue" />
{
  type: 'div',
  props: { className: 'blue' }
}
// Above is the real representation of a react element
We understood react functional component is just a JavaScript function which returns a react element which is a simple JavaScript object. And we're not the one who calls the component functions, react does that for us.
Rendering is the process in which React calls the component function, executes the code inside it and creates a virtual DOM tree from the returned JSX or React element which represents the component's UI.
After rendering is finished, react compares the virtual DOM with the real DOM and applies only the minimum required changes to update the real DOM, which a user sees on the screen. The process of finally updating the real DOM tree to match the virtual DOM tree is called reconciliation.
When a component re-renders?
Here are some common reasons why a functional component might be re-rendered:
Changes in props or state: If a component's props or state changes, the component will be re-rendered.
Parent re-render: If a component's parent component is re-rendered due to some reason, the child component will also re-render.
Context updates: If a component's context changes, either due to changes in a parent component's context or due to changes in the global context, the component will be re-rendered to reflect these changes.
UseEffect hook updates: If a functional component uses the
useEffecthook to manage side effects, the component may be re-rendered if the hook's dependencies change.UseMemo and UseCallback hook updates: If a functional component uses the
useMemooruseCallbackhook to optimize performance by memoizing expensive computations or callback functions, the component may be re-rendered if the hook's dependencies change.
It's worth noting that functional components are optimized for performance, and React's virtual DOM and reconciliation algorithms are designed to minimize the number of actual changes made to the DOM during a re-render, which helps to improve performance and reduce page load times.
What are lazy initializers?
There are many instances where we want to initialize the state variable based on some computation or value returning from a function which has some expensive computation. For example- Initializing a state value based on some data from localStorage, getting these values is computationally expensive.
Here's an example code of what would it look like-
// Code without Lazy Initialization
import React, { useState } from 'react';

export default function ThemeComponent() {
  const getThemeFromLocalStorage = () = {
    // Logic for getting theme value from localStorage
    // This might be an Expensive function
    // It returns theme value - "light" or "dark"
  }

  const themeValue = getThemeFromLocalStorage()
  const [theme, setTheme] = useState(themeValue);

  return (
    <div>
      <h1>{theme}</h1>
    </div>
  );
}
We get the value of theme from localStorage in variable themeValue by calling the function getThemeFromLocalStorage()(assume this function has logic of getting values from the localStorage) and set the state variable theme based on themeValue. Now, every time ThemeComponent is re-rendered due to some reason, it'll run all the code inside it. It'll also execute getThemeFromLocalStorage() on every re-render and store the returned value in themeValue, but useState will not use themeValue to initialize the state variable theme because every re-renders have there own copy of the state value and they're only initialized with the value passed in the useState in the first render.
So, themeValue is of no use on subsequent re-renders, but the function getThemeFromLocalStorage() is called on every re-render. This might be an expensive function, which will ultimately negatively impact the performance.
In simple terms, Lazy Initialization is a way to avoid calling functions like getThemeFromLocalStorage() on every re-render and just call in the first re-render and not set the value returned from it in the state variable. See the code below.
// Code with Lazy Initialization
import React, { useState } from 'react';

export default function ThemeComponent() {
  const getThemeFromLocalStorage = () = {
    // Logic for getting theme value from localStorage
    // This might be an Expensive function
    // It returns theme value - "light" or "dark"
  }

  // Lazy initialization
  const [theme, setTheme] = useState(getThemeFromLocalStorage);

  return (
    <div>
      <h1>{theme}</h1>
    </div>
  );
}
Creating a function is fast, so there's no issue in creating the function getThemeFromLocalStorage(), even if what the function does is computationally expensive. So we only pay the performance penalty when we call the function getThemeFromLocalStorage(). If we pass a function to useState, React will only call the function when it needs the initial value (which is when the component is initially rendered). The function should be a returning function so that it returns a value for useState to set it in the state variable.
Stages in a component's lifecycle
The image below is taken from this GitHub repository. The credit for this image goes to Donavon West, Revel Carlberg West, and Dan Abramov.
Let's understand the flow and its phases in detail.
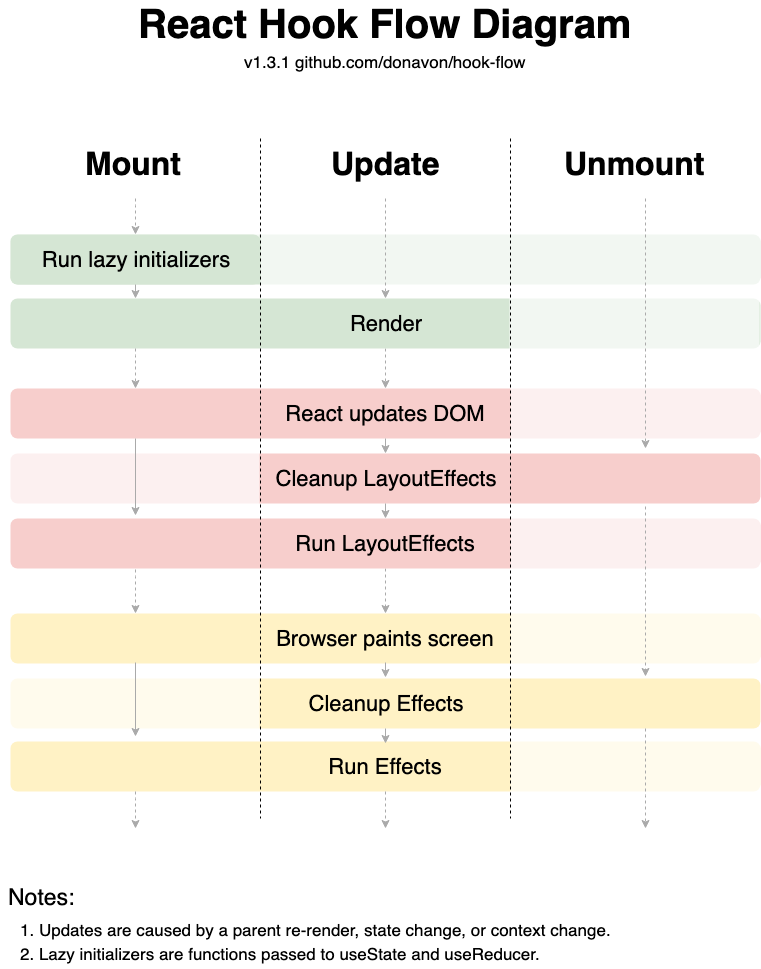
The lifecycle of a React functional component contains three phases -
Mount
Update
Unmount
Mount
Mounting is the process of putting the elements in the real DOM for the first time.

Let's go step by step -
The first thing which happens in this phase is to run the lazy initializers (we have already talked about this).
Then react renders the component (we have talked about render in detail above).
After render is done and React element is returned from the component function, it updates the DOM tree with the visual content which needs to be painted on the screen.
Then react runs the LayoutEffects. This is the function written in
useLayoutEffecthook. The difference betweenuseLayoutEffectanduseEffectis thatuseLayoutEffect's code runs before the contents are actually painted on the screen, but after the layout has been calculated (we have talked about layout in Critical Rendering Path).
SinceuseLayoutEffectruns before the painting of content on the screen and blocks the browser from painting till its internal code has finished executing, we should avoid putting computationally expensive and time-consuming tasks inuseLayoutEffectand should consideruseEffect.After LayoutEffects are done executing, the browser paints the DOM content on the screen.
After the painting is done, it executes the contents of
useEffecthook. There are three ways of havinguseEffecthook (Will talk about this in detail, some other day). The three ways are - without dependencies, with an empty dependency array, and with some content in the dependency array. In all three cases, useEffect will run once in the mount phase.
Update
The update phase happens due to various reasons such as parent component re-render, state change and context change.

Let's assume that an update is happening because of an internal state change. Let's understand it in detail.
When the state change (or some other event occurs that triggers the update phase) happens, the component re-renders. In case of state change, when the component re-renders, the new render has the newly updated state snapshot.
Then simply react updates the virtual DOM tree which has instructions of what needs to be shown on the screen.
From here, the story is different in the update phase. Since the component is already mounted on the screen, react now runs the cleanup of
LayoutEffectsfrom the previous render and then runs the new LayoutEffect. Cleaning the LayoutEffect is just executing the code inside the function which is returned from theuseLayoutEffect's function. I'll talk about the detailed use cases of useLayoutEffect, useEffect and their cleanups in some other article.import React, { useState, useLayoutEffect } from "react"; export default function MyComponent() { const [count, setCount] = useState(0); useLayoutEffect(() => { console.log("Bwoser will paint updates after this"); // 👇 This is the cleanup function return () => { console.log("Component unmounted"); }; }, []); return ( <div> <p>Count: {count}</p> <button onClick={() => setCount((prev) => prev + 1)}> + </button> </div> ); }Then browser paints the screen.
After the screen is painted, the cleanup of
Effectsare run. Cleanup ofEffectsare the content inside the function which is returned from the setup function ofuseEffecthook. You can imagine the function as the same asuseLayoutEffect. The difference is thatLayoutEffectsand its cleanups are run before the painting is done whileEffectsand its cleanups are run after the painting is done.
Unmount
Unmounting refers to the process of removing a component from the DOM tree. When a component is unmounted, its cleanup functions are executed, and its state and props are no longer accessible.

While being removed from the DOM, the component runs the cleanups of LayoutEffects first, then the cleanups of Effects and finally be removed from the real DOM completely. If the component has to come again in the real DOM, it'll have to go through the mount phase again.
And this wraps up the overview of the lifecycle of a React functional component. We also talked about Critical Rendering Path which was necessary to understand the difference between LayoutEffects and Effects.
Feel free to connect with me on Twitter for feedback, ideas, suggestions, etc.
Thank You so much for your valuable time and reading it till the end 😊!
